
Tools You’ll Need for Installing an Electrical Junction Box
Before beginning the installation of your electrical junction box, gather the following tools and materials:
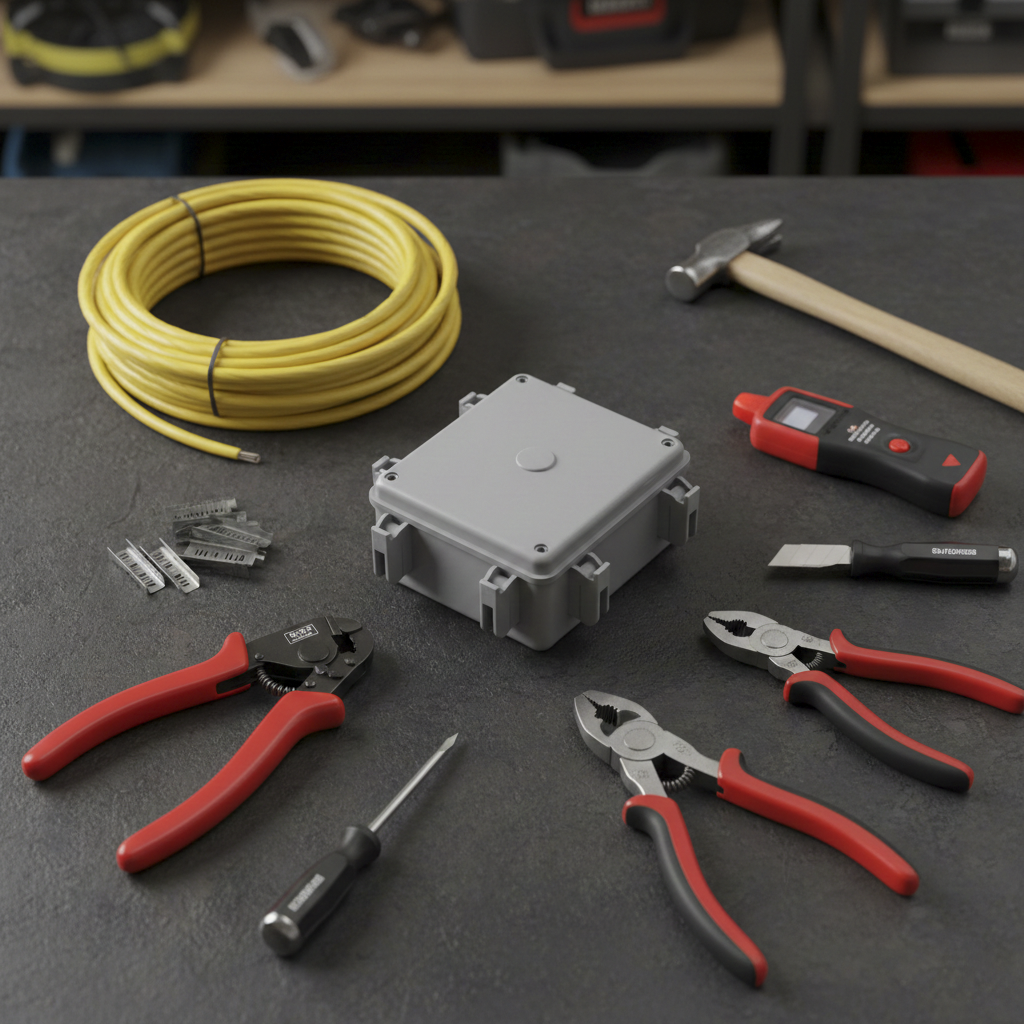
- NM Cable: This is the electrical wire you’ll use to connect your junction box.
- Junction Box: The enclosure that holds your electrical connections.
- Cable Staples: These will help you secure the cables to the wall.
- Cable Ripper: A tool for removing the outer insulation from the cable.
- Screwdriver: A flathead or Phillips screwdriver for securing the junction box.
- Wire Strippers: To strip the insulation off the wires.
- Utility Knife: Useful for cutting cables and stripping insulation.
- Non-Contact Voltage Tester: To ensure there is no power flowing through the wires before you begin.
- Hammer: For securing the junction box to the wall if needed.
Once you have all your tools ready, proceed with the next steps to ensure a safe and effective installation.
Step 1: Safety First
Before doing any electrical work, turn off the power at the breaker.
- Turn off the power at the circuit breaker.
- Verify the power is off using a voltage tester.
Step 2: Positioning the Junction Box
Mount the junction box in the middle of the run, ensuring there is enough slack. You need at least 6 inches of cable inside the box after the splice.
- Hold the box in the chosen location.
- Use a hammer or screws (depending on the model) to secure it firmly to the structure.
Step 3: Feeding the Cables Into the Box
Now it’s time to bring the splice cables into the junction box.
- Plastic junction boxes usually have built-in clamps or flexible tabs.
- Metal junction boxes require removing a knockout before feeding the wires, and usually need cable clamps.
- Since your model already has pre-installed clamps, feed the cables through the top and the bottom openings, ensuring they pass securely through the clamp mechanism.
Step 4: Preparing the Wires
With the junction box mounted, it’s time to clean and prepare the wires.
- Use a cable ripper to remove the outer jacket.
- Strip about ½–¾ inch of insulation from each conductor (hot, neutral, and ground).
- Organize the wires by color for easy identification.
Step 5: Matching and Twisting the Wires
Match the wires by color and twist them to create a solid mechanical connection:
- Black to black → hot wires
- White to white → neutral wires
- Green or bare copper → ground wires
Use needle-nose pliers to hold the wires together and another pair of pliers to twist them clockwise until they form a tight mechanical connection.
Note on Metal Boxes: If you are installing a metal junction box, you must also connect a grounding pigtail to the box’s dedicated grounding screw.
Step 6: Securing With Wire Nuts
Next, add a wire nut to each group of twisted wires.
- Push the wire nut onto the twisted connection.
- Twist it to the right until it’s firmly seated.
- Give a gentle tug on the wires to ensure the connection is secure inside the nut.
Repeat this process for the hot, neutral, and ground connections.
Step 7: Final Assembly and Code Compliance
Push the connected wires neatly into the junction box, making sure nothing is pinched or overly bent. Install the cover plate securely.
Critical Code Note: Box Fill Capacity
The electrical code requires that the volume of a junction box is adequate for all the elements it contains. An overloaded box can cause overheating and, consequently, a fire risk.
To ensure compliance:
- Verify the Volume: Boxes have their maximum capacity (in cubic inches or cm³) engraved inside.
- Count the Elements: You must count the total number of conductors, clamps, and devices (if the box contains a switch or receptacle) that are installed within it.
- Consult Tables: Use the local electrical code tables (e.g., National Electrical Code or NEC) to calculate the minimum required volume based on the wire gauge and the number of elements. Never exceed the capacity marked on the box.
Important Electrical Code Notes
- A junction box cannot be buried behind drywall, insulation, or any other material. It must remain accessible at all times.
- The cover must be solid and cannot have any holes or gaps.