Most installations fail within a year due to simple preparation errors or uneven heating application. You are sealing a connection against vibration, moisture, and chemical attack. This material is your last line of defense.
If you are serious about reliability—whether it’s automotive, marine, aerospace, or industrial control panels—you need the proven, repeatable process, not just the basic steps. Here is the definitive procedure, straight from two decades in the field.
Preparation: The 90% Solution
The quality of your installation is determined before the heat gun ever turns on. Ignoring surface preparation guarantees premature failure.
Sizing and Placement
The first and most common mistake is improper sizing. You must select tubing large enough to slip easily over the widest component (usually the lug or terminal), yet small enough that when fully shrunk, it conforms tightly to the narrowest point (the cable jacket).
Measure twice. Cut once.
The golden rule for industrial applications is a 3:1 or 4:1 shrink ratio. These higher ratios simplify installation, accommodate complex joint geometries, and ensure a tight fit across varying diameters. Do not buy low-ratio 2:1 cheap polyolefin unless you are simply bundling wires inside a dry enclosure.
Pro Tip: Pre-Positioning is Mandatory
Slide the required length of heat shrink tubing onto the wire before crimping or soldering the terminal. You cannot slide it over the finished terminal afterward. If you forget this step, you must cut the connector off and start over.
Surface and Wire Cleaning
This step is non-negotiable, especially in harsh environments. The internal adhesive of dual-wall tubing must bond perfectly with the wire jacket and the terminal. Any oil, flux residue, or dirt will compromise the seal.
- Clean the Terminal: Wipe the metal terminal and the adjacent wire insulation with a clean cloth dampened with Isopropyl Alcohol (IPA 99%) or an electrical contact cleaner.
- Allow Drying: Wait until the solvent is completely evaporated. Moisture kills seals.
Selecting the Right Heat Shrink Material
Not all materials are equal. Choosing the wrong type is installing a known point of failure.
Dual-Wall vs. Single-Wall
- Single-Wall (Standard Polyolefin): Great for cable bundling, strain relief, and identification. It shrinks but does not seal. Use it for organizational purposes only. It is a useless defense against moisture intrusion.
- Dual-Wall (Adhesive-Lined): This is the industry standard for environmental protection. The outer jacket shrinks, while the inner adhesive melts, flows into all surface voids, and hardens.
Critical Requirement
If moisture is a threat, use adhesive-lined tubing. Always.
Environmental Concerns
Match the tubing material to the threat:
| Threat | Material Recommendation |
|---|---|
| Moisture/Water | Dual-Wall Polyolefin (Adhesive Lined) |
| Oil/Fuel/Solvents | Fluoroelastomer (Viton) or Modified Polyolefin |
| High Heat/Abrasion | PTFE or Kynar |
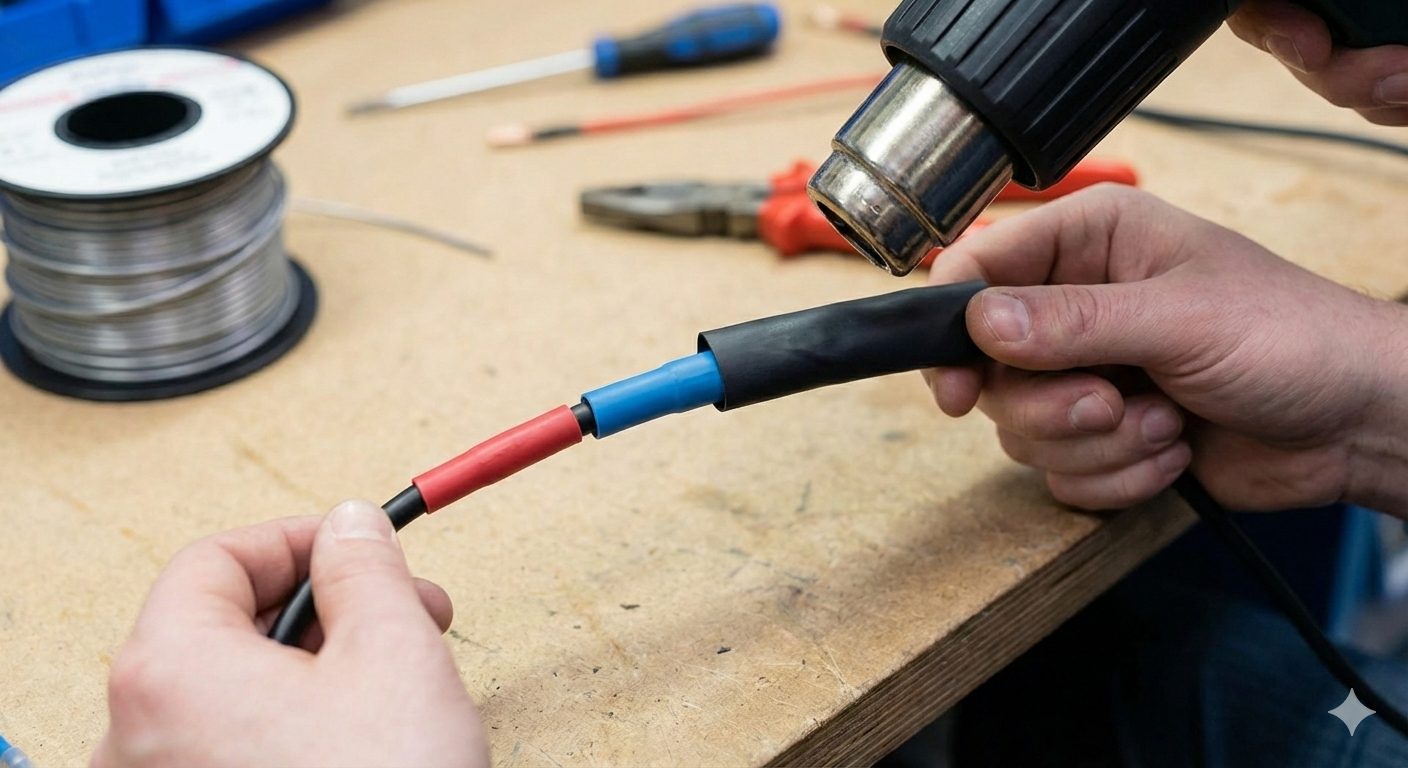
The Installation Process: Applying the Heat
Tooling defines success. Amateurs use lighters. That connection will fail.
Tool Selection: Heat Gun is the Only Answer
- Heat Gun (Preferred): Provides uniform, high-volume hot air. Most professional heat guns have adjustable temperature settings (typically 250°F to 400°F required for melting the adhesive). This prevents localized overheating.
- Butane/Propane Torch (Avoid): Open flame introduces carbon deposits, which compromise the material integrity. Torches also create severe hot spots.
The Critical Heating Technique
- Position and Overhang: Center the tubing perfectly. Ensure equal overhang onto the cable jacket and the terminal body. You must cover all exposed metal.
- Start from the Center: Apply heat to the absolute center of the heat shrink piece first. This is a crucial step.
- Work Outward: Slowly move the heat gun outwards toward one end. Maintain constant motion. This forces trapped air and melted adhesive toward the open ends.
- Rotate Slowly: Continuously rotate the wire assembly while heating to ensure all sides receive uniform temperature exposure.
- Visual Confirmation: Continue heating until you see a uniform, clear bead of melted adhesive extruded from the circumference of both ends. This "seal ring" confirms a complete seal.
Post-Installation Integrity Check
Do not touch the connection immediately. Allow the material to cool completely and the adhesive to cure (typically 5 to 10 minutes).
- Uniformity: The tubing should be smooth and fully conforming.
- Wrinkles: Wrinkles indicate uneven heating or trapped air. If wrinkles are severe, restart the job.
- Pull Test: Apply a gentle tug. The heat shrink should not peel or slide back easily.
Heat shrink installation is engineering, not arts and crafts. Use the right material, clean your surfaces, and apply even heat from the center out. That is how you build reliable connections that last.